1. 列表出全部方式

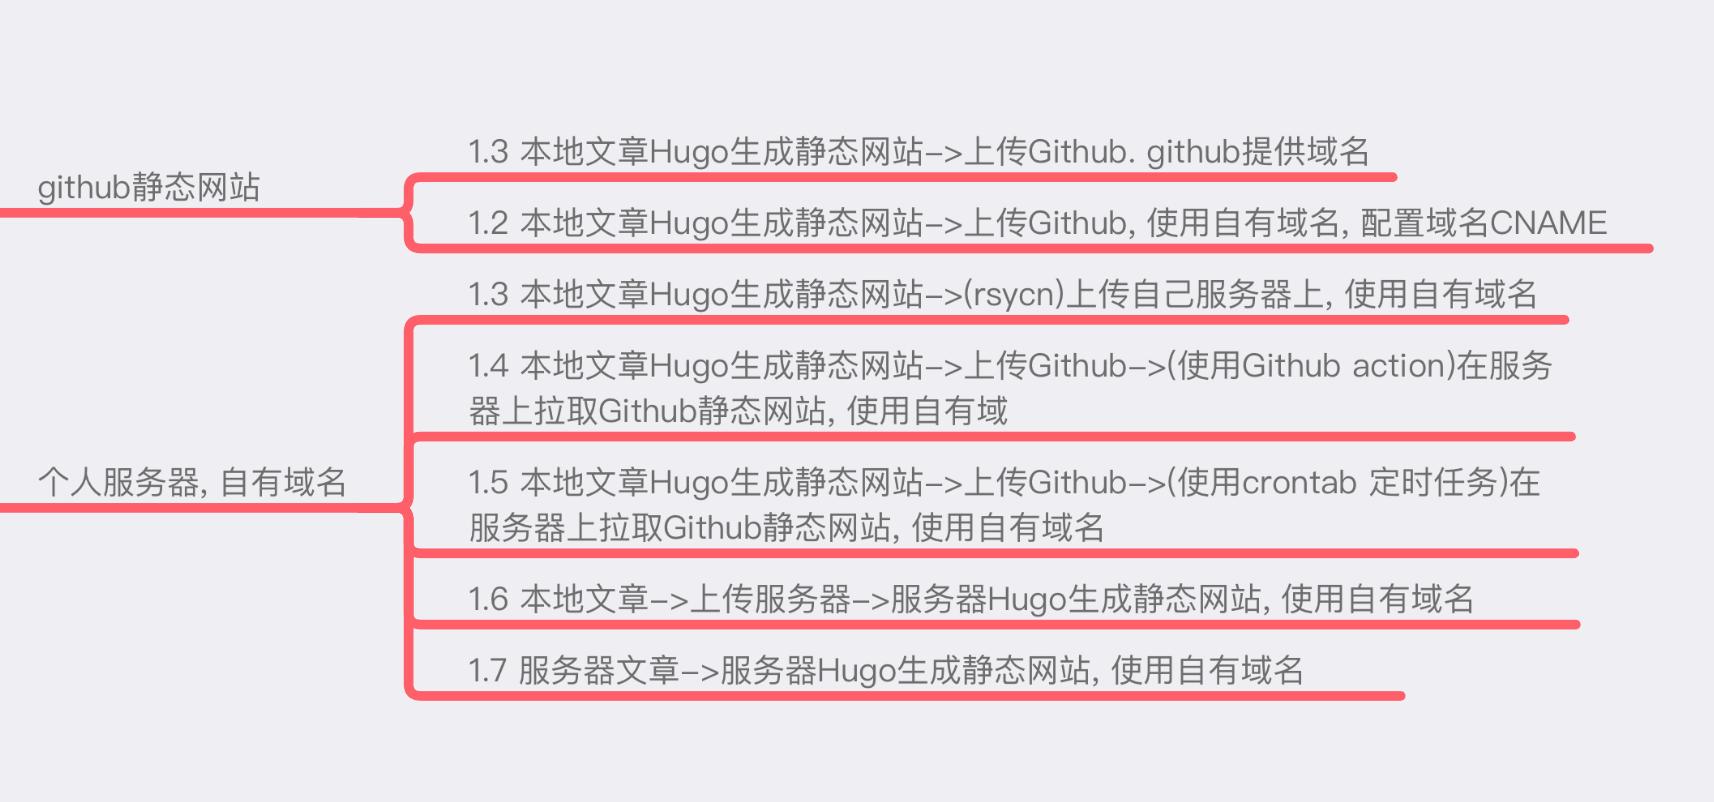
1.1 本地文章Hugo生成静态网站->上传Github, Github提供域名
1.2 本地文章Hugo生成静态网站->上传Github, 使用自有域名, 配置域名CNAME
1.3 本地文章Hugo生成静态网站->(rsycn)上传自己服务器上, 使用自有域名
1.4 本地文章Hugo生成静态网站->上传Github->(使用Github action)在服务器上拉取Github静态网站, 使用自有域名
1.5 本地文章Hugo生成静态网站->上传Github->(使用crontab 定时任务)在服务器上拉取Github静态网站, 使用自有域名
1.6 本地文章->上传服务器->服务器Hugo生成静态网站, 使用自有域名
1.7 服务器文章->服务器Hugo生成静态网站, 使用自有域名
2. 方式比较
| 方式 | 是否推荐 | 是否免费 | 更新及时 | 是否使用自有域名 | 难易程度(1最容易) |
|---|---|---|---|---|---|
| 1.1方式 |
|
|
|
|
|
| 1.2方式 |
|
|
|
|
|
| 1.3方式 |
|
|
|
|
|
| 1.4方式 |
|
|
|
|
|
| 1.5方式 |
|
|
|
|
|
| 1.6方式 |
|
|
|
|
|
| 1.7方式 |
|
|
|
|
|
1.1方式(推荐), 免费, 更新及时, 会使用Hugo Git Markdown即可, 最简单的方式.
1.2方式(推荐), 除了1.1有的内容, 可使用自己域名.
1.3方式(推荐), 方式简单, 更新及时,会使用Hugo Markdown rsycn 配置ssh key即可
1.4方式(推荐), 自动化程序最高, 只需要上传到Github就可触发, 更新及时, 难度也稍微高点. 除会使用Hugo Git Markdown, 还需要使用Github action, SSH KEY配置.
1.5方式, 如半小时拉一次Github, 则有延时
1.6 1.7 更新同样及时, 不够自动化, 需要手动登录服务器执行.
3. 推荐方式使用, 1.1, 1.2, 1.3, 1.4 方式.
3.1 (方式 1.1 使用)
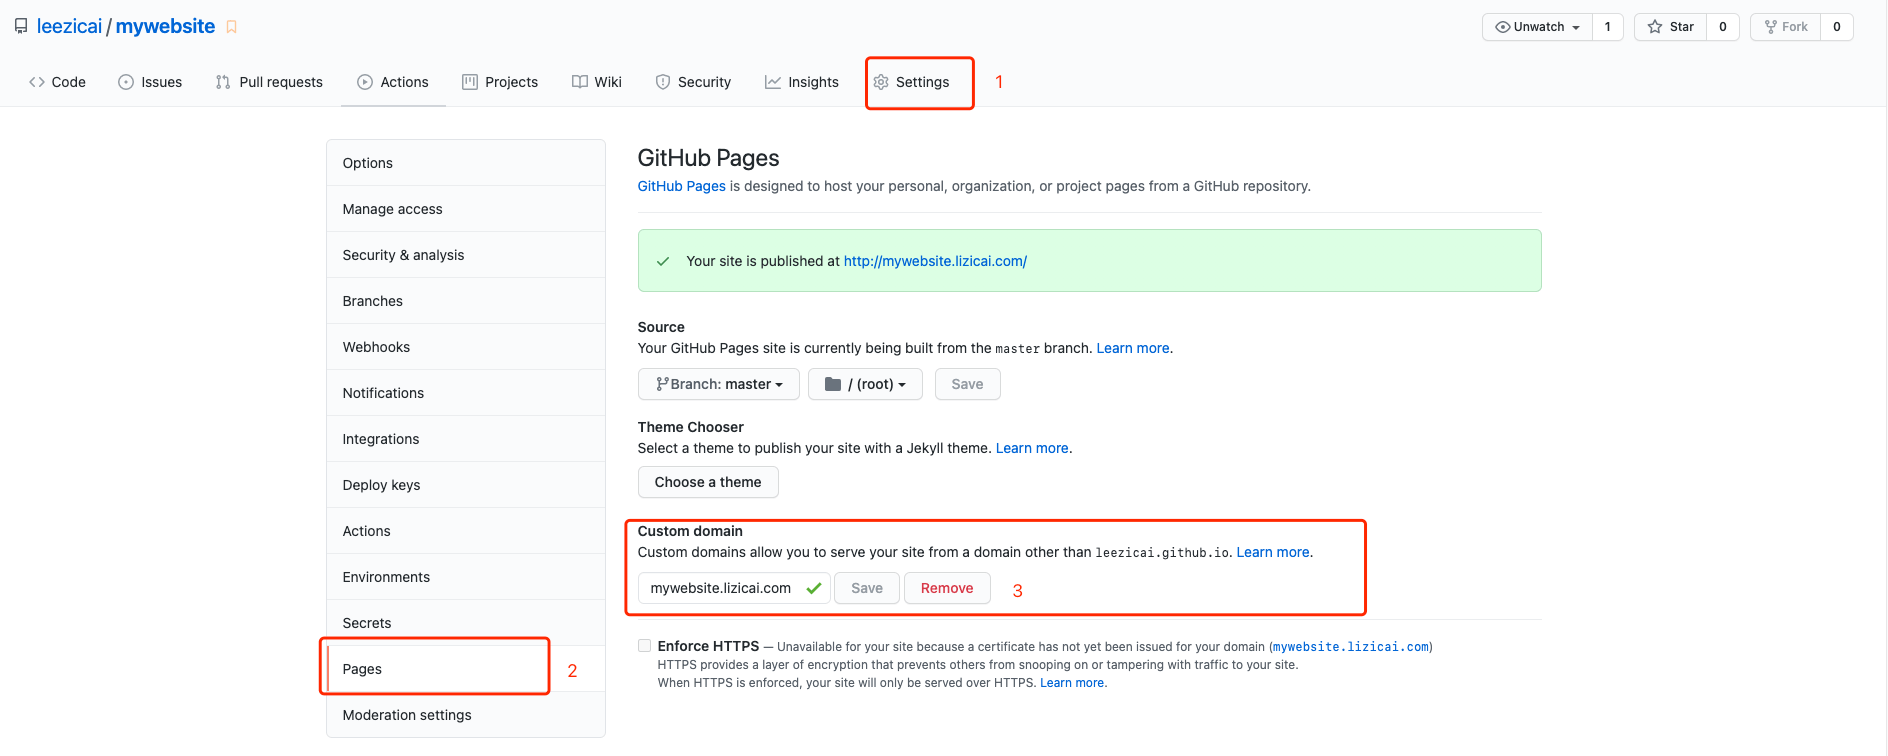
3.2 (方式 1.2 使用)
设置CNAME记录mywebsite.lizicai.com leezicai.github.io

git pull
直接访问http://mywebsite.lizicai.com, 显示错误

页面显示错误
cd ~/mywebsite
hugo --theme=papermod --baseUrl="https://mywebsite.lizicai.com/" --destination=mywebsite

cd mywebsite
# 远程仓库名称github, 在方式1.1重命名过, 注意, 未重命名则是orign
git add  .
git commit -m  "test"
git push orign master

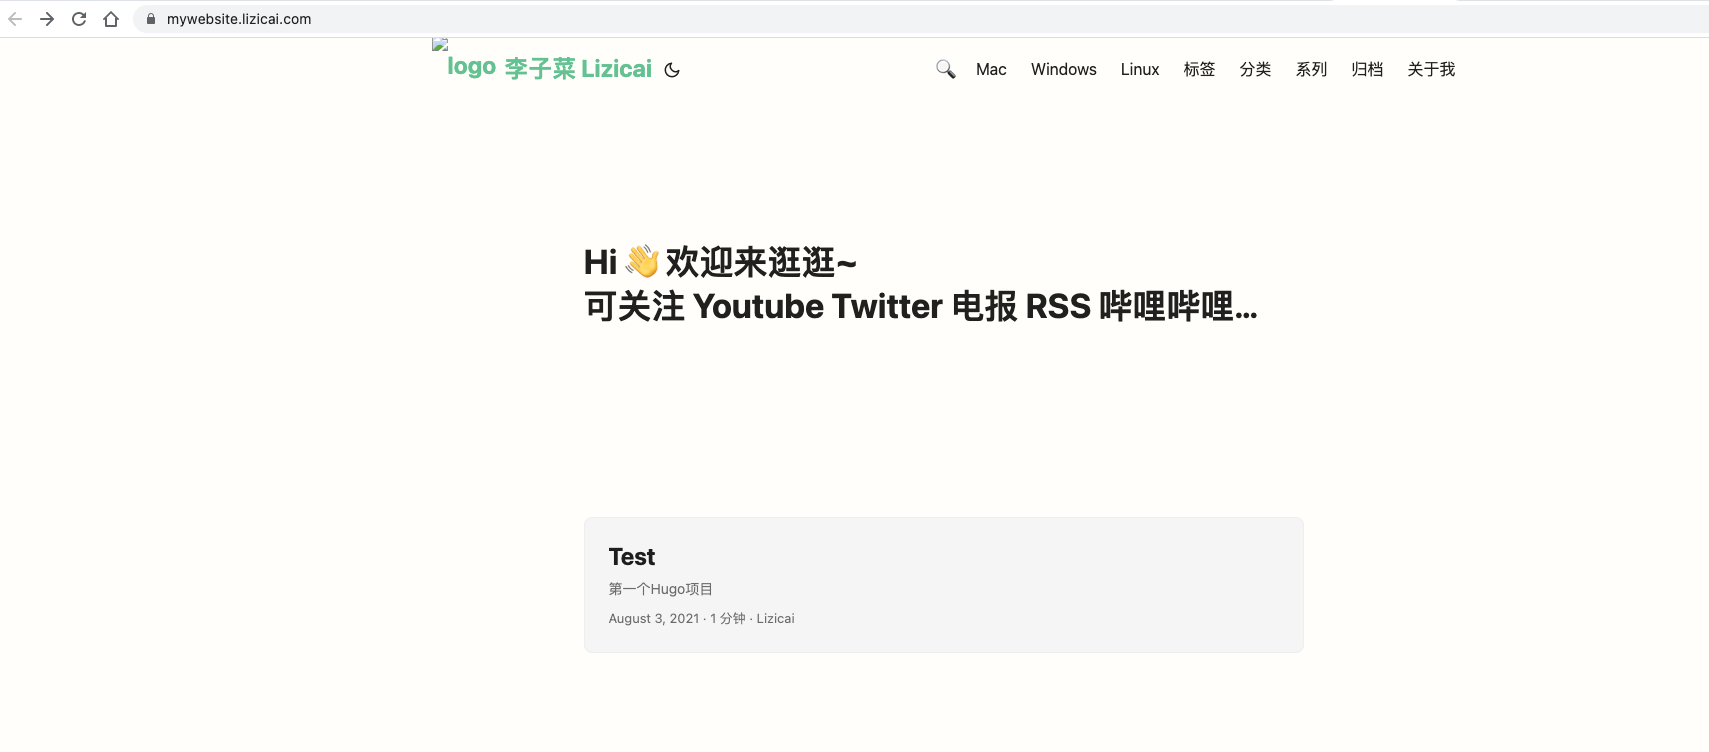
正确显示内容
3.3 (方式 1.3 使用), rsycn用法
ssh-keygen -t ed25519
ssh-copy-id -i ~/.ssh/test.pub [email protected]  -p 22

# vim ~/.ssh/config,存入以下内容
Host myhost
 User root
 Port 22
 HostName 192.168.1.100
 PreferredAuthentications publickey
 IdentityFile ~/.ssh/test
以lizicai.com网站为例
upli(){
    LOCAL_PATH="${HOME}/lizicai/lizicai.com/"
    SERVER_PATH="lizicai.com/"
    echo "\033[42;30m Begin rsync ${LOCAL_PATH} myhost:${SERVER_PATH}...  \033[0m"
    rsync -aut --delete --exclude '.DS_Store' ${LOCAL_PATH} myhost:${SERVER_PATH}
    echo "\033[42;30m Finash.  \033[0m"
}
3.4 (方式 1.4 使用), Github Action 事件驱动的,意味着您可以在指定事件发生后运行一系列命令. 比如push后就登录服务器拉取Github代码.
ssh-keygen -t ed25519
# test.pub复制到服务器[email protected]上.
ssh-copy-id -i ~/.ssh/test.pub [email protected]  -p 22

# vim ~/.ssh/config,存入以下内容
Host myhost
 User root
 Port 22
 HostName 192.168.1.100
 PreferredAuthentications publickey
 IdentityFile ~/.ssh/test

生成密钥

ls查看生成的密钥
https://github.com/settings/keys
将test.pub内容复制上去即可
# 使用scp将~/.ssh/test复制到服务器上
scp ~/.ssh/test myhost:.ssh/

# 登录服务, 配置
ssh myhost
# vim ~/.ssh/config添加如下内容
Host github.com
 User git
 HostName github.com
 PreferredAuthentications publickey
 IdentityFile ~/.ssh/test
ssh myhost

cd ~

git clone [email protected]:leezicai/lizicai.com.git
server{
    listen 80;
    server_name lizicai.com;
    return 301 https://lizicai.com$request_uri;
}
server {
    listen       443 ssl;
    server_name  lizicai.com;
    charset utf-8;
    ssl_certificate /root/cert/lizicai.com/fullchain.pem;
    ssl_certificate_key /root/cert/lizicai.com/private.key;

    #charset koi8-r;
    #access_log  /var/log/nginx/host.access.log  main;

    location / {
        root   /root/lizicai.com/;
        index  index.html index.htm;
    }
    error_page  404              /404.html;

    # redirect server error pages to the static page /50x.html
    #
    error_page   500 502 503 504  /50x.html;
    location = /50x.html {
        root   /root/lizicai.com/;
    }
}

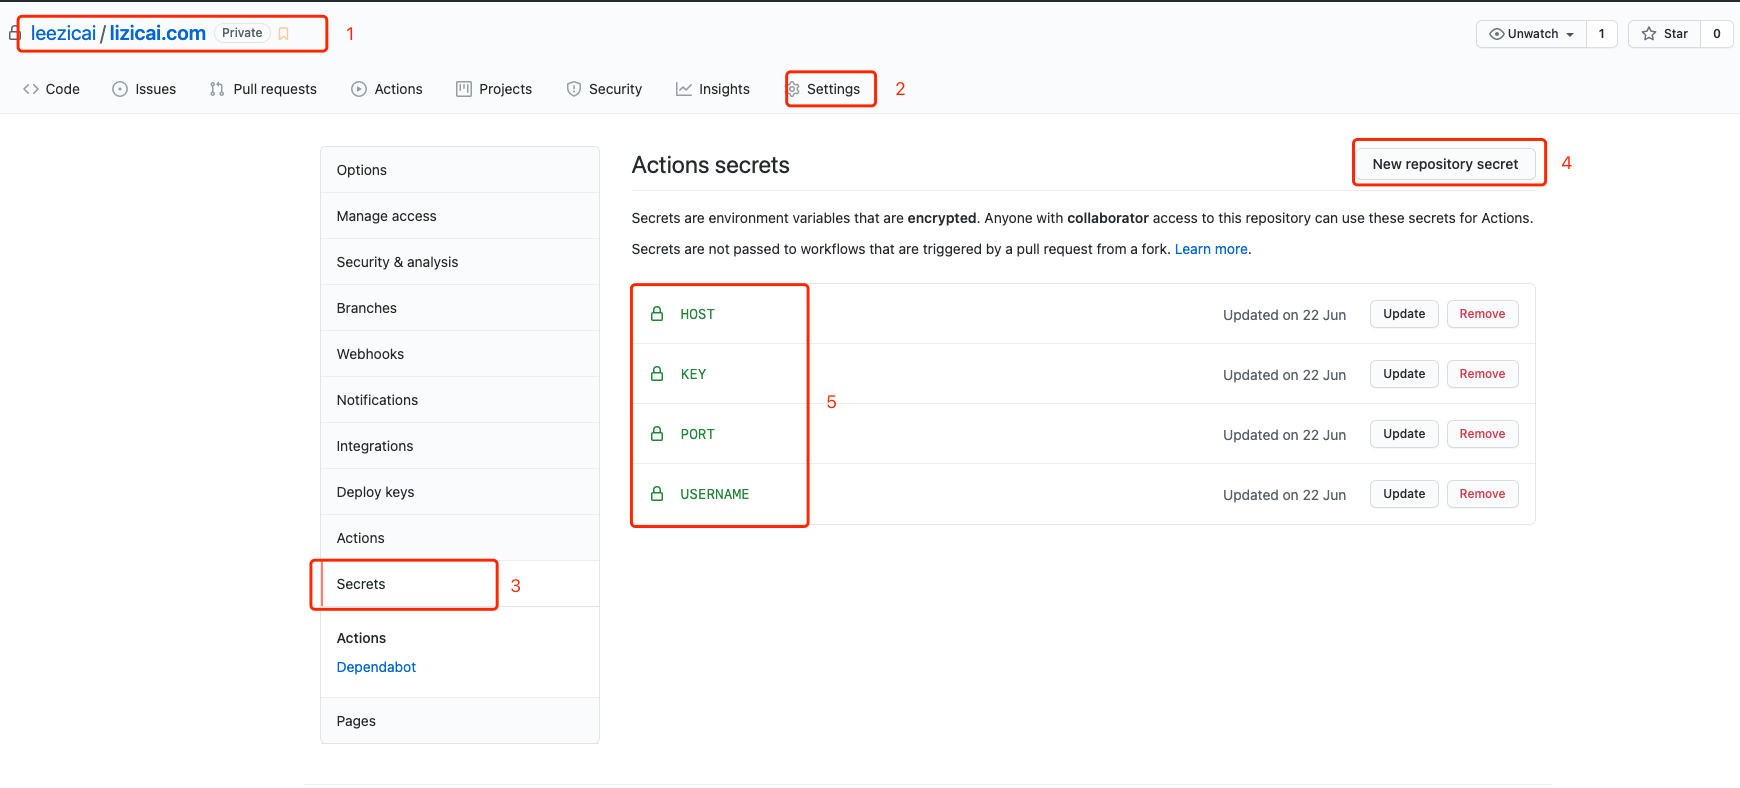
设置Github Action
使用步骤1 SSH Key内容, 配置如下参数
HOST 192.168.1.100
PORT 22
USERNAME root
KEY 复制~/.ssh/test中的内容
# 这里是github静态网站目录
cd ~/lizicai/lizicai.com
# 创建文件夹
mkdir -p .github/workflows
# vim git-pull-lizicai-com.yml, 添加如下内容

name: Git Pull Lizicai.com

on:
  push:
    branches:
      - master

jobs:
  ssh-job:
    name: git pull lizicai.com  job
    runs-on: ubuntu-latest
    steps:
      - name: ssh git pull
        uses: appleboy/ssh-action@master
        with:
          host: ${{ secrets.HOST }}
          username: ${{ secrets.USERNAME }}
          key: ${{ secrets.KEY }}
          port: ${{ secrets.PORT }}
          script: |
            cd ${HOME}/lizicai.com
            git pull
cd ~/lizicai/lizicai.com
git add .
git commit -m "Github action"
# 远程仓库origin已改名为github
git push github master
每次推送时就会触发, 在服务器上登录, 拉取Github代码

执行成功