1. 直接脚本安装, 分别安装openss 1.1.1k和Nginx.
步骤2 3分步安装是脚本的解释. 步骤4是配置和验证.
curl -O https://raw.githubusercontent.com/leezicai/share/master/nginx/yum_install_openssl.sh
sh yum_install_openssl.sh

curl -O https://raw.githubusercontent.com/leezicai/share/master/nginx/yum_install_openssl_nginx.sh
sh yum_install_openssl_nginx.sh
2. 分步安装, 安装Opentssl, tls1.3需要openssl 1.1.1以上版本, 默认CentOS中openssl版本1.1.1以下, 不支持.
# 安装需要编译的软件
yum install -y gcc gcc-c++ pcre-devel zlib-devel make unzip gd-devel perl-ExtUtils-Embed libxslt-devel openssl-devel perl-Test-Simple

yum groupinstall -y 'Development Tools'

cd /usr/src

wget https://www.openssl.org/source/openssl-1.1.1k.tar.gz

tar xvf openssl-1.1.1k.tar.gz

cp -r openssl-1.1.1k openssl

cd openssl

./config --prefix=/usr/local/openssl --openssldir=/usr/local/openssl --libdir=/lib64 shared zlib-dynamic

make -j4

make test

make install

mv /usr/bin/openssl /usr/bin/openssl-backup

ln -s /usr/local/openssl/bin/openssl /usr/bin/openssl
3. 分步安装, 编译安装Nginx, 编译安装nginx脚本
3.1 编译安装Nginx, 需要指定openssl的路径.
# 编译安装nginx
cd /usr/src

wget http://nginx.org/download/nginx-1.21.1.tar.gz

tar xvf nginx-1.21.1.tar.gz

cd nginx-1.21.1

# 使用命令nginx -V查看编译参数, 和官方源保持一致, 仅用添加--with-openssl=/usr/src/openssl即可.
./configure --prefix=/etc/nginx --sbin-path=/usr/sbin/nginx --modules-path=/usr/lib64/nginx/modules --conf-path=/etc/nginx/nginx.conf --error-log-path=/var/log/nginx/error.log --http-log-path=/var/log/nginx/access.log --pid-path=/var/run/nginx.pid --lock-path=/var/run/nginx.lock --http-client-body-temp-path=/var/cache/nginx/client_temp --http-proxy-temp-path=/var/cache/nginx/proxy_temp --http-fastcgi-temp-path=/var/cache/nginx/fastcgi_temp --http-uwsgi-temp-path=/var/cache/nginx/uwsgi_temp --http-scgi-temp-path=/var/cache/nginx/scgi_temp --user=nginx --group=nginx --with-compat --with-file-aio --with-threads --with-http_addition_module --with-http_auth_request_module --with-http_dav_module --with-http_flv_module --with-http_gunzip_module --with-http_gzip_static_module --with-http_mp4_module --with-http_random_index_module --with-http_realip_module --with-http_secure_link_module --with-http_slice_module --with-http_ssl_module --with-http_stub_status_module --with-http_sub_module --with-http_v2_module --with-mail --with-mail_ssl_module --with-stream --with-stream_realip_module --with-stream_ssl_module --with-stream_ssl_preread_module --with-cc-opt='-O2 -g -pipe -Wall -Wp,-D_FORTIFY_SOURCE=2 -fexceptions -fstack-protector-strong --param=ssp-buffer-size=4 -grecord-gcc-switches -m64 -mtune=generic -fPIC' --with-ld-opt='-Wl,-z,relro -Wl,-z,now -pie' --with-openssl=/usr/src/openssl

make -j4

make install
3.2 创建Nginx服务, 参考官方
# 创建nginx服务
vi /lib/systemd/system/nginx.service

# 输入以下内容
[Unit]
Description=The NGINX HTTP and reverse proxy server
After=syslog.target network-online.target remote-fs.target nss-lookup.target
Wants=network-online.target

[Service]
Type=forking
PIDFile=/run/nginx.pid
ExecStartPre=/usr/sbin/nginx -t
ExecStart=/usr/sbin/nginx
ExecReload=/usr/sbin/nginx -s reload
ExecStop=/bin/kill -s QUIT $MAINPID
PrivateTmp=true

[Install]
WantedBy=multi-user.target
3.3 启动nginx服务, 已经支持tls1.3.
# nginx.service生效
systemctl daemon-reload

systemctl enable nginx

systemctl start nginx
4. 配置和验证tls1.3
4.1 配置支持tls1.3
在https服务中服务以下参数即可.
ssl_protocols    TLSv1.1 TLSv1.2 TLSv1.3;
ssl_prefer_server_ciphers    on;
ssl_ciphers                 TLS13-AES-256-GCM-SHA384:TLS13-CHACHA20-POLY1305-SHA256:TLS13-AES-128-GCM-SHA256:TLS13-AES-128-CCM-8-SHA256:TLS13-AES-128-CCM-SHA256:EECDH+CHACHA20:EECDH+CHACHA20-draft:EECDH+ECDSA+AES128:EECDH+aRSA+AES128:RSA+AES128:EECDH+ECDSA+AES256:EECDH+aRSA+AES256:RSA+AES256:EECDH+ECDSA+3DES:EECDH+aRSA+3DES:RSA+3DES:!MD5;

配置后重启nginx
systemctl restart nginx
4.2 浏览器中查看tls版本.
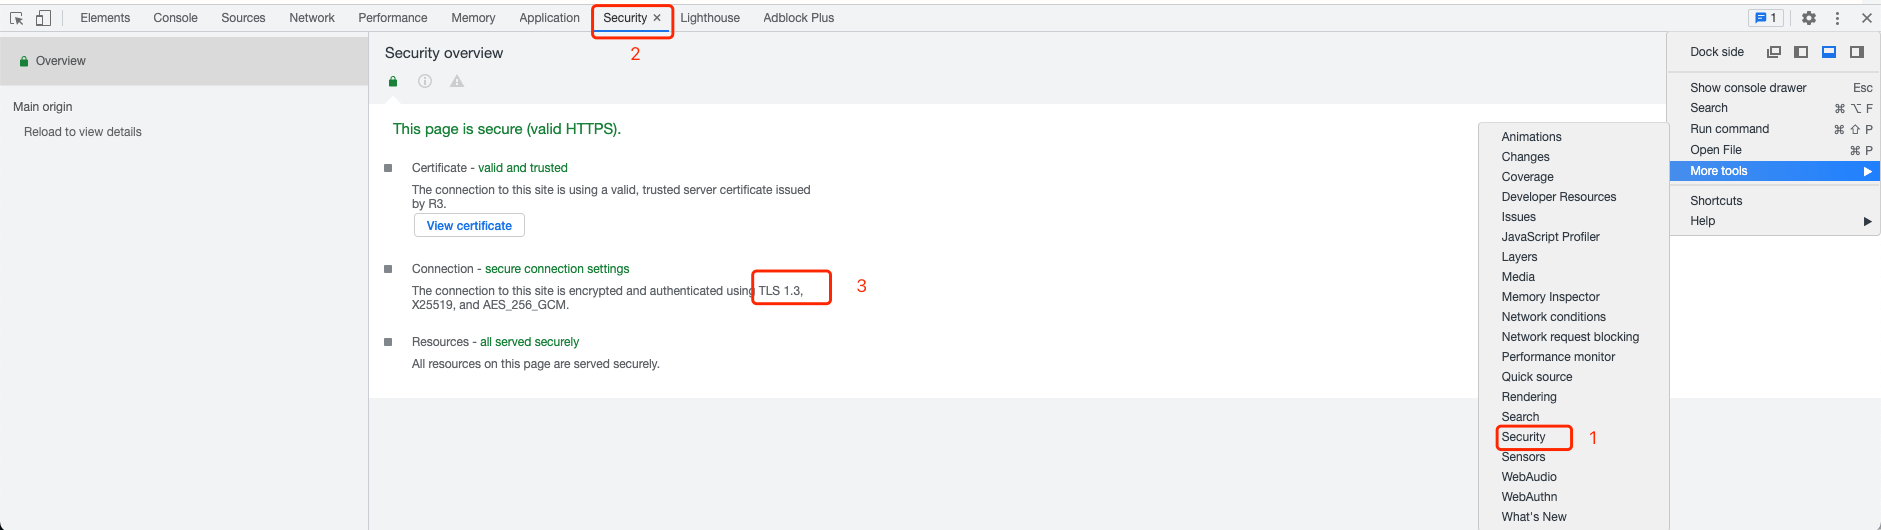
Google Chrome浏览器添加Security即可查看